Table Of Content
We value your feedback more than anything, let us know in the comments about what type of hairstyle you want us to target next. However, you will have to draw the same front hair with some small clumps as it is ‘short’. But this look will be a little towards the messier side. If you still want to draw the same type of hair, you can follow the same principles as before.
New Official Articles
We can also start making general strokes of strands that fall alongside the face. Once we have a basic sketch of the character we can now draw in the hairline. Drawing the hairline allows you to establish how the hair will form around the head and facial structure. We then can lightly erase that grid and use the ghost lines of that grid to help us establish features on the face. It’s always good to start with the eyes of the character, as well as forming the facial structure. Once all of the shadows are in place you should have a finished drawing of a curly anime/manga hairstyle.
How to Design Characters with Bold Fashion and Strong Silhou…
Erase (or set high transparency) to show only the hint of your sketch. Then attempt to draw a perfect circle over it in a single smooth and swift gesture. This part is very fun, and there are many ways to add shine to the hair. To do this, lay out a general shape with the shading color. Outline all the strands, adding some details on them as you go. If you want to make the hair more detailed, you can add lines following the rhythm.
EPIC My Hero Academia Fan Art (HQ Images)
Add some shadows to the side sections of the hair in a way similar to those for the forehead. Draw the hair in fairly large clumps that curve in different directions to help create a messy look. You can see the key stages of the tutorial in the preview image above but there are many more illustrations provided throughout it’s different steps. Sketch a few thick parts of the hair that come off of the hairline and on to the face. Even if you feel like already satisfied with the drawing, it is always interesting to mess around with the correction layers. Be careful with it, though, because it can quickly distort your illustration beyond recognition, so make sure you use it in moderation.
While the side and back might be identical, when it comes to the front hair, things get a little complex. This is where we can play around with how the hair sits around the head and how messy or neat the hair can appear by how many jagged edges we add to the hairstyle. This is where we can start to work in some bold lines that give the hair a more distinct outline, making it a little more animated. We can also start to use ghost lines to assist us in making more refined lines in the correct directions. We want to make sure that we give the eyes some detail, this is because we will be drawing hair with detail. You want to make sure there is consistency in the character design.
We can also try to work with a more defined jawline, this way we give a more masculine quality to the anime character. Try to work a little on the features to make sure you are happy with them so that once we erase the drawing slightly, we have a good reference to work with. Play around with how you would like the hairline to fill in on the forehead of the anime character.
About This Article

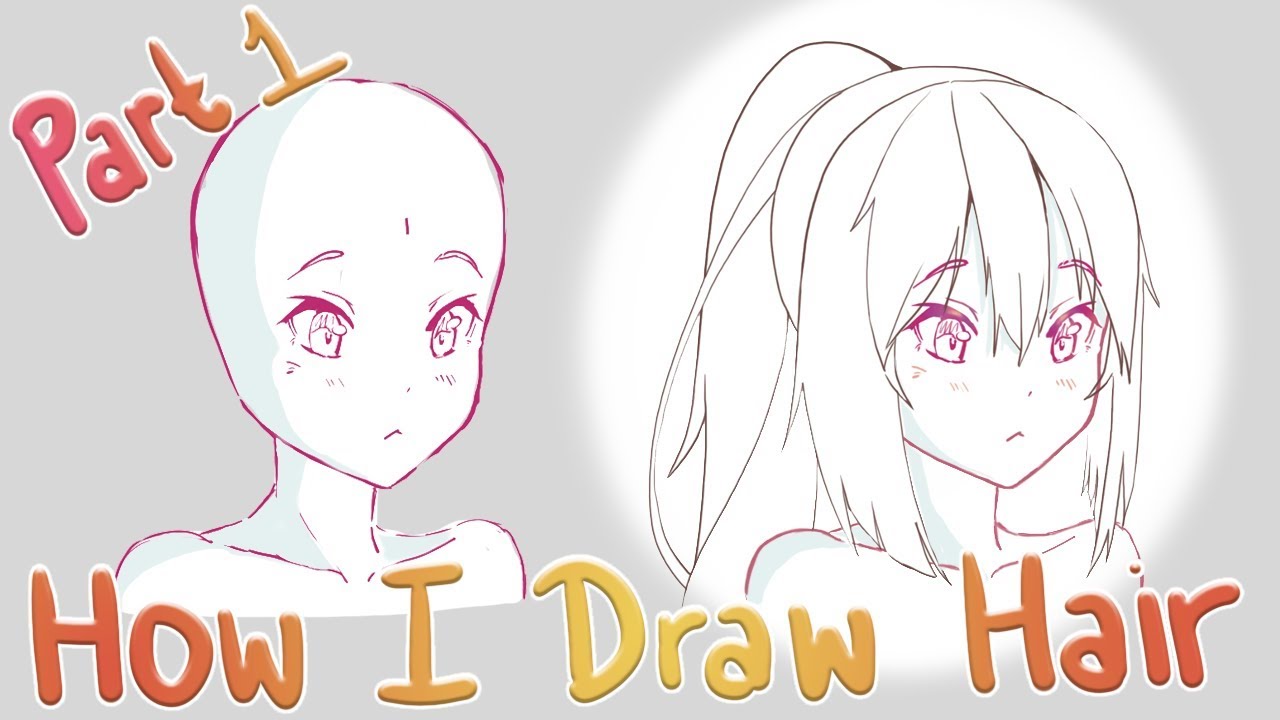
You will want to draw the entire head even though large parts of it will eventually be covered by the hair. Doing so will make it easier to give the hair proper volume and to avoid mistakes. Messy looking hair is quite common in anime and is often one of the most defining characteristics of some characters. This tutorial looks at the specifics of drawing such a hair using a female hairstyle as an example. Create additional hairpieces for the back of the head.
My Hero Academia Theory: The Real Reason So Many Girls Shortened Their Hair - CBR
My Hero Academia Theory: The Real Reason So Many Girls Shortened Their Hair.
Posted: Mon, 10 Oct 2022 07:00:00 GMT [source]
EPIC Anime Text Art you can Copy and Paste to Friends!
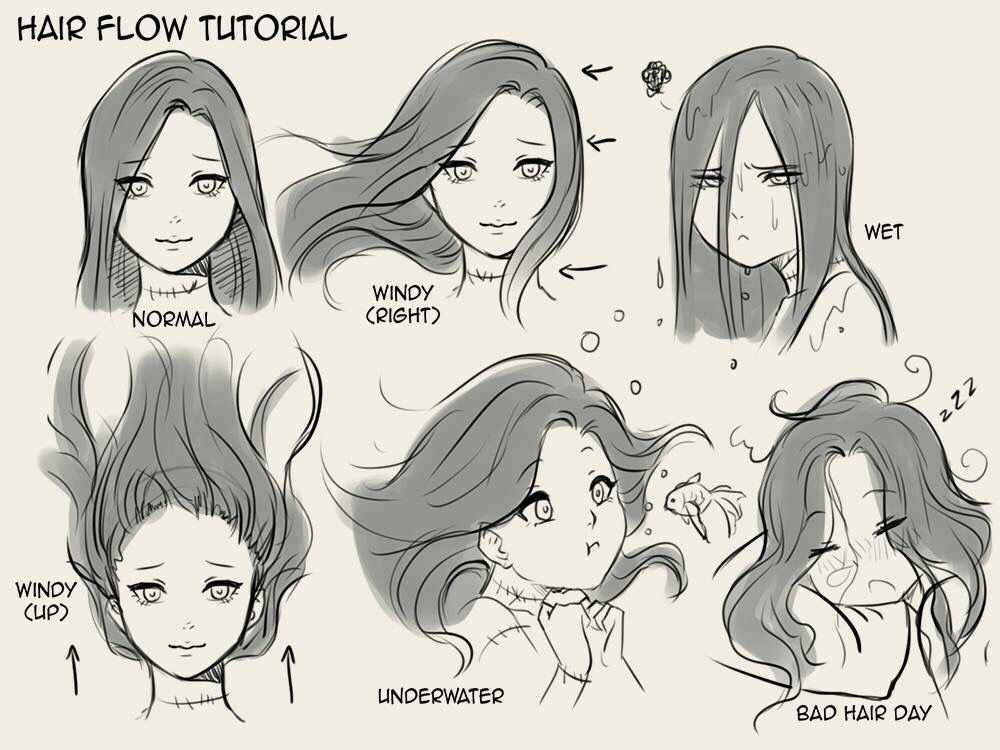
So before we start drawing hair, we need to be clear on how the hair sits on the head. That is to say, we need to know how much volume it takes up. Is the hair very puffy and big, or does it sit just on the top of the skull, kind of like wet hair does?
MangaGAN. Teaching computers to draw new and… by TD - Towards Data Science
MangaGAN. Teaching computers to draw new and… by TD.
Posted: Sun, 10 Dec 2017 08:00:00 GMT [source]
For the first step of the shading process simply fill in the entire area of the hair with grey (or use color if you prefer). You can then erase parts of the top/background section’s outline in the spots where you’ve added the clumps. For the top/background section of the hair draw it somewhat following the shape of the head as it goes down and then getting wider around the level of the ears.
I also add light points in certain places to make them stand out and highlight specific strands. Just like with the manga style, I start by creating a new layer on top of the main drawing and draw the outline of the hair. Long hair is one of the most popular hairstyles when it comes to anime. As you can see in the example below, the hairstyle is cute and attractive.
It allowed me, for example, to draw small, light, white strands around the hair, which wouldn’t show up on a white background. But in the end, I decided to remove the background because I think the portrait works better without it. In fact, it was because the face was lighter than the background they didn’t go well together. Instead of darkening the whole portrait, I just decided to keep the background white.
And at that point, I realize I don’t really like the color of the shadow. I lock the layer so it doesn’t move outside the frame and I go over it with another color. Since we’re not going for realism, I can exaggerate the proportions a bit. Generally, in manga, the size of the skull is larger than a real skull, as are the eyes. But depending on your style, it’s up to you how you want to proportion things.
Unless drawing digitally it’s recommended that you use a pencil and start with light and easy to erase lines. Erase your first layer leaving a faint sketch, and then draw the second layer of hair on top. Vary the length, the shape and add some partitions to it. Alternatively you can simply create the highlights as you shade or add them in over top of the shading if drawing digitally (in a new layer). Before shading the drawing you can outline a series of little highlights running across the forehead area and side section of the hair. These are to show light reflecting from it’s smooth surface and to give the hair a more shiny appearance.
Before proceeding, identify the outline of the head. This video tutorial shows how to draw hair in the anime/manga style with a detailed line by line breakdown of the drawing process. If you don’t know which color to use, you can take the hair color, create a new layer, set the blending mode to Add (Glow), and then add blobs, triangles, lines, etc.